Setting up a Private Relay
Run your own relay for traffic that cannot take a direct path
What a Relay Does
A Netrinos network is a full mesh of direct encrypted tunnels. When two devices connect, they coordinate through the broker and establish a direct path between themselves. Traffic flows peer-to-peer, and the broker is not in the data path.
Sometimes a direct path cannot be established. This usually happens when both sides sit behind restrictive firewalls or NAT that block incoming connections. When that happens, the peers fall back to a relay.
A relay is a third Netrinos device that both peers can reach. It forwards encrypted packets between them. The encryption keys belong to the two original peers, so the relay never sees the contents. To the relay, the traffic is opaque ciphertext.
By default, Netrinos provides relay capacity for accounts that need it. A private relay lets you run your own.
Requirements for the Relay Device
A relay only works if both peers can reach it. Putting the relay at the same site as one of the peers does not help, because the other peer is the one with the connectivity problem. This is why a cloud server is the usual choice: it sits outside any customer NAT and is reachable from anywhere on the internet.
The relay is a standard Netrinos client running on Linux, Windows, or macOS. It needs:
- A stable internet connection. If the relay goes offline, the sessions it carries drop.
- Public reachability on its UDP listen port. The simplest case is a server with a direct public IP, like a cloud VM. If the relay sits behind NAT, the upstream router must forward the UDP port to the relay's LAN address (e.g.
11.12.13.14:51820 → 192.168.1.14:51820). The forwarded external port must match the listen port on the relay. - A static public IP and port. Peers connect to a fixed address, so neither can change. A dynamic IP from a residential ISP is not suitable unless you pair it with dynamic DNS and a manual update workflow.
Setting Up the Relay
1. Provision the Server
The example below uses a cloud VM. The same steps apply to any Linux host that meets the requirements above. Create a Linux VM at any hosting provider (DigitalOcean, Linode, Vultr, Hetzner, AWS, etc.).
- OS: Debian 11+ or Ubuntu 22.04+. Other distributions work but are not the primary test target.
- Resources: 1 vCPU and 1 GB RAM is enough for most accounts. For high-throughput networks or many concurrent relayed sessions, use 2 vCPU and 2 GB.
- Network: A public IPv4 address. IPv6-only is not currently supported.
2. Open the UDP Port at the Provider Firewall
Most cloud providers put a network-level firewall in front of the VM (security groups, cloud firewalls, network ACLs). Open inbound UDP 51820, or whichever port you plan to use. Do not open TCP. Netrinos uses UDP only.
This is separate from any host firewall rules you configure inside the VM.
3. Harden the OS
Before exposing the VM to the internet, apply standard hardening: disable password and root SSH login, use key-based authentication, configure a host firewall, keep packages updated. This document does not cover hardening, but it should be done. A relay is a server you run. Treat it like any other internet-facing server.
4. Install Netrinos
Install the Linux client from download.netrinos.com/linux and log in with your account credentials. The relay shows up as a normal device on your account and can run virtual devices, gateways, and access control like any other peer.
5. Set the Listen Port
Netrinos picks a random UDP port at startup. A relay needs a fixed port that matches the firewall rule and the static endpoint you will set in the next step.
On the relay device, open a terminal and run netrinos lport <port>. The tunnel restarts to pick up the new port. Expect a brief reconnection delay on this device.
$ netrinos lport
Listen port: 57426 (auto-assigned)

$ netrinos lport 51820
Listen port set to: 51820
Tunnel restarting in background...

$ netrinos lport
Listen port: 51820
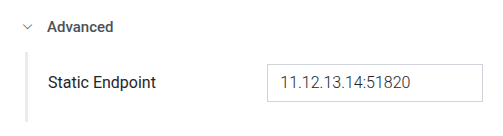
6. Configure the Static Endpoint
The static endpoint tells the rest of the mesh how to reach this device. Without it, peers use whatever endpoint the broker has observed, which works for normal clients but is not stable enough for a relay.
In the web portal, go to Devices, select the relay, and expand the Advanced section. Set Static Endpoint to the server's public IP and the listen port you chose in the last step. For example, 11.12.13.14:51820.
If the relay is behind NAT, use the public IP of the router, not the LAN address. The port must match the forwarded port.
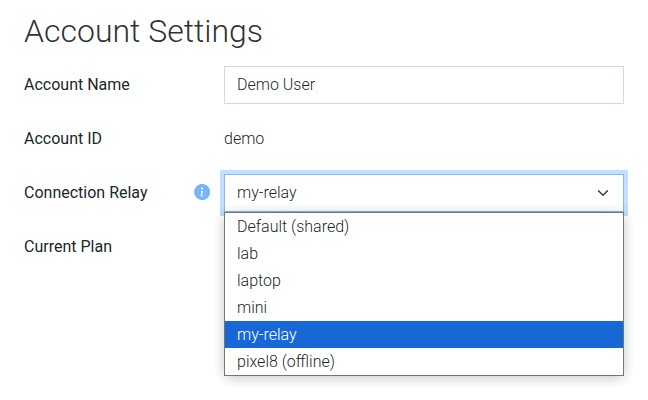
7. Designate the Relay on Your Account
Once the device is ready, tell your account to use it as the relay. You must be the account admin.
In the web portal, go to Account Settings and set Connection Relay to the relay device.
Each account can have only one relay. Once designated, all relayed traffic for the account routes through it.
How It Behaves in Practice
Netrinos always prefers a direct connection. Peers try a direct path first and only use the relay if that fails.
Devices periodically retest for a direct path. If network conditions improve, for example a peer roams from a restrictive cellular network to friendlier WiFi, Netrinos detects the new direct path and stops using the relay automatically.
Peers that can connect directly never touch the relay. Most accounts need only a small relay because the typical relay rate is low.
The relay is a single point of failure for the sessions it carries. Run it on infrastructure you can keep online.