Edge Node Port Forwarding
Netrinos Edge Node software consists of two components:
- Private Web App: Runs directly on the edge device itself.
- Central Portal: A web-based directory and control center for all your edge devices.
Finding an Edge Device
Start by logging in to the Netrinos website site with your Nertinos username and password.
- Go to
https://app.netrinos.com
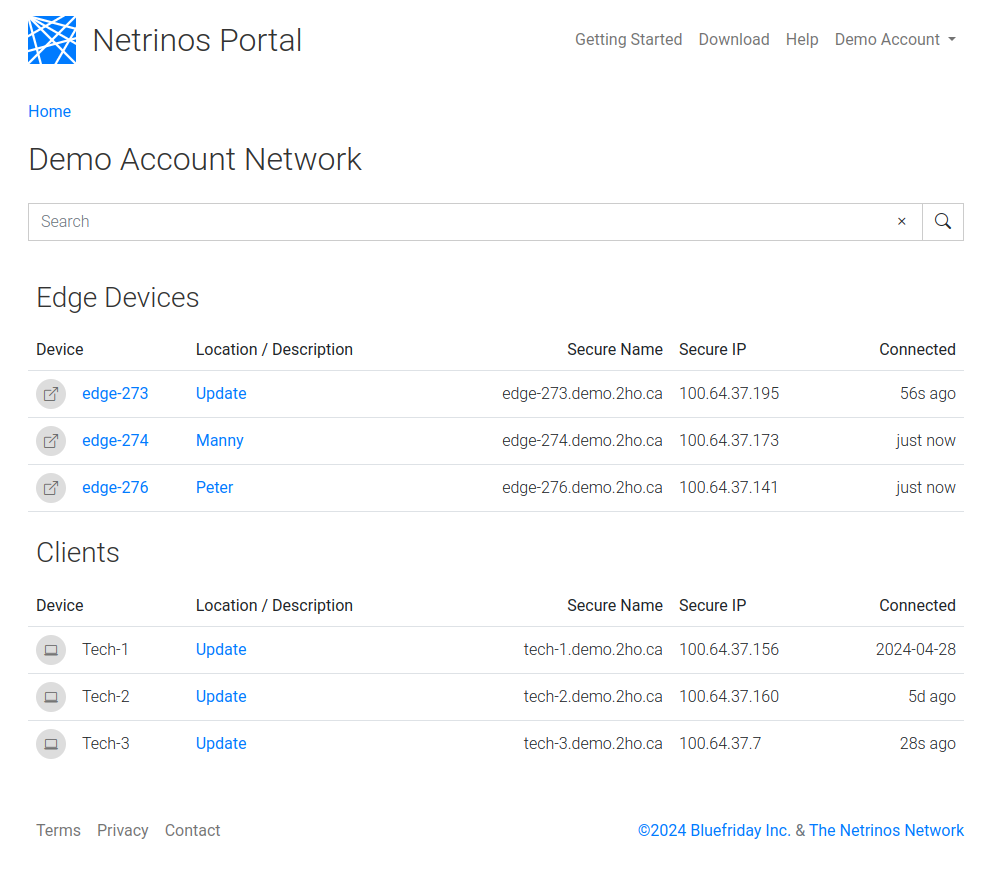
This will present a list of the existing devices in your network.
In the case of the Edge Node service, the list will be broken down by Client devices (those accessing the remote networks) and Edge Devices (the devices providing the port forwarding).
- The Device column lists links to the management interface on each edge device.
- The Description column lists links to update each device's name and description fields.
Editing a Device Name
Editing the Description allows you to document where the device is located and makes the list easier to navigate.
- Click the Description link.
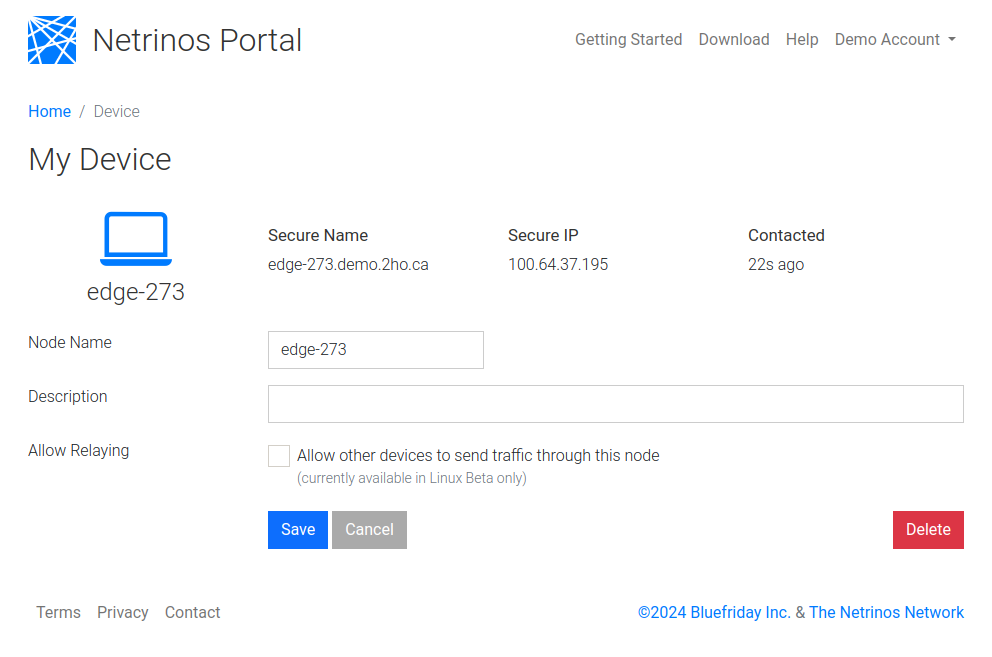
The Node Name field will default to the hostname of the edge device. It can be changed to any other name. This name will be used to form the device's Secure Name (DNS name). So, keep that in mind.
The device will receive a static IP address that is private and not reachable from the public Internet. This address will remain static for the lifetime of the device. If the device is deleted, it will return to the pool of available addresses. You can access the device using its Secure Name or Secure IP.
Note: Allow Relaying has no context for the Edge Node edition and may be removed in the future. It references the Masquerading feature in the regular Netrinos client.
Acccessing an Edge Device
Back in the list of devices,
- Click the Device Name to open the Edge Device.
The URL will be in the form of http://devicename.account.2ho.ca:88. The port is configured at the account level.
- Log in to the management interface with the edge node UI username and password.
This is NOT for the device's OS or your Netrinos account. This account was set up in the project settings and is inherited by all edge devices. The http port, username, and password are configured on the main account and are automatically bassed down to the devices.
Using the Edge Node
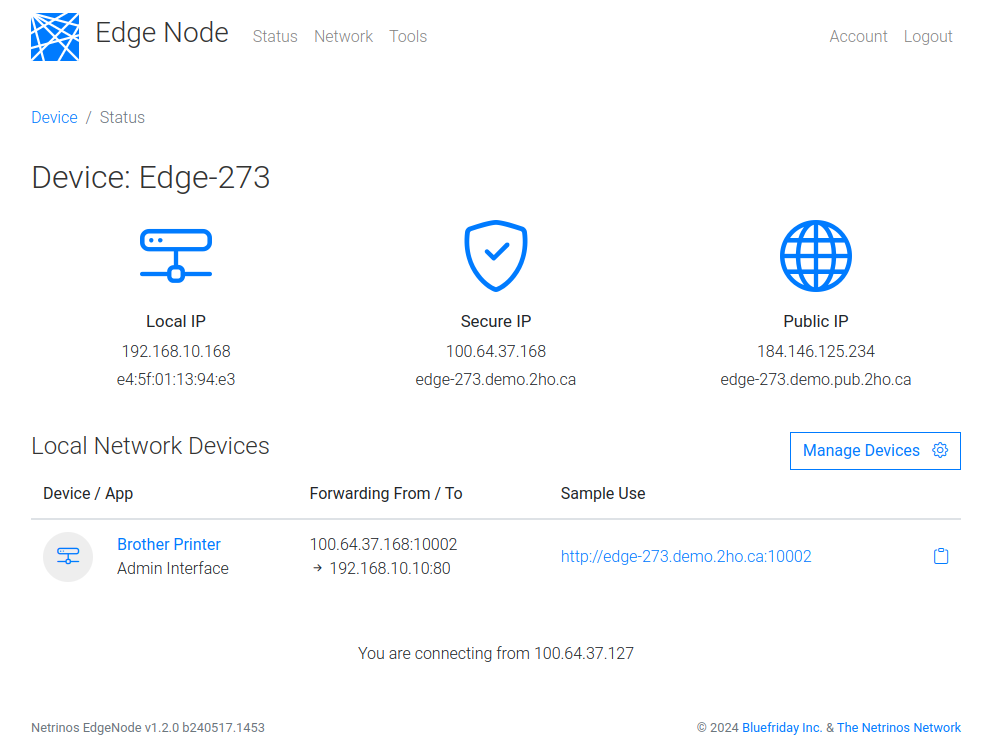
This is the main dashboard of the edge node software. It shows some basic information about the site and a summary of forwarded ports. By default, there are none.
Click Manage Devices to set up new devices.
Managing Devices
When the service starts, it will automatically find and scan networks the Edge Device is connected to.
By default, it will only scan it once. You can click Scan Now to scan it again. You must do this if you have added equipment or changed the networks to scan.
The can can also be configured to be periodic, but this does create some load on the network and devices. It is usually best to scan on demand.
Choosing Networks to Scan
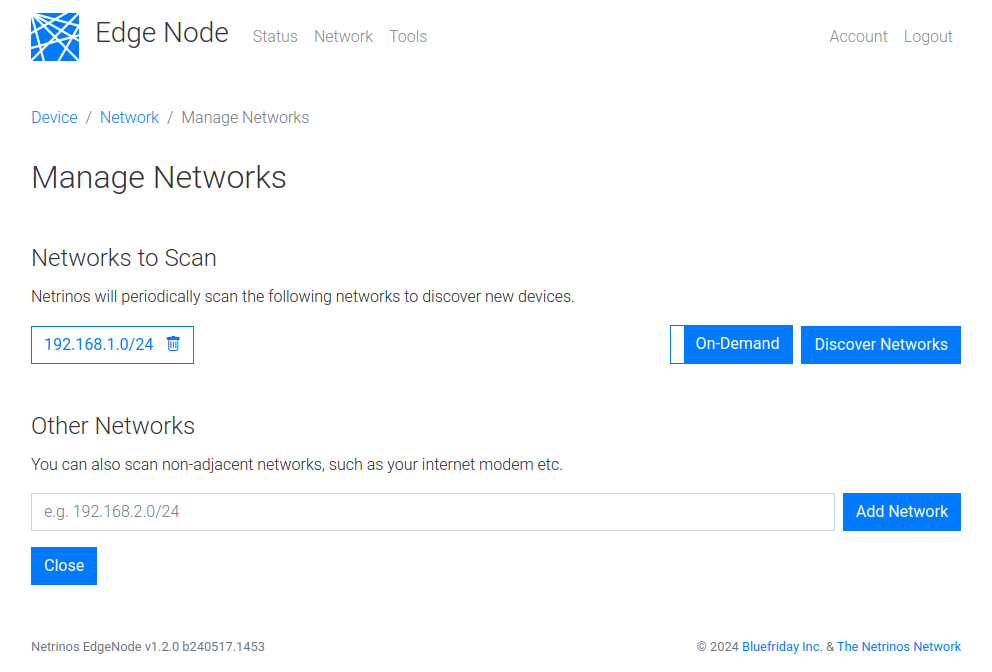
Click Manage Networks to change the scan configuration.
This page shows you the networks that were discovered on start-up.
If it finds networks you do not want to scan, you can delete them.
You can also add other non-adjacent networks to scan. For example, you can scan for devices on a different subnet than the edge device is connected to. For example, devices could be on the ISP modem and not the home network.
Click Close.
Port Forwarding
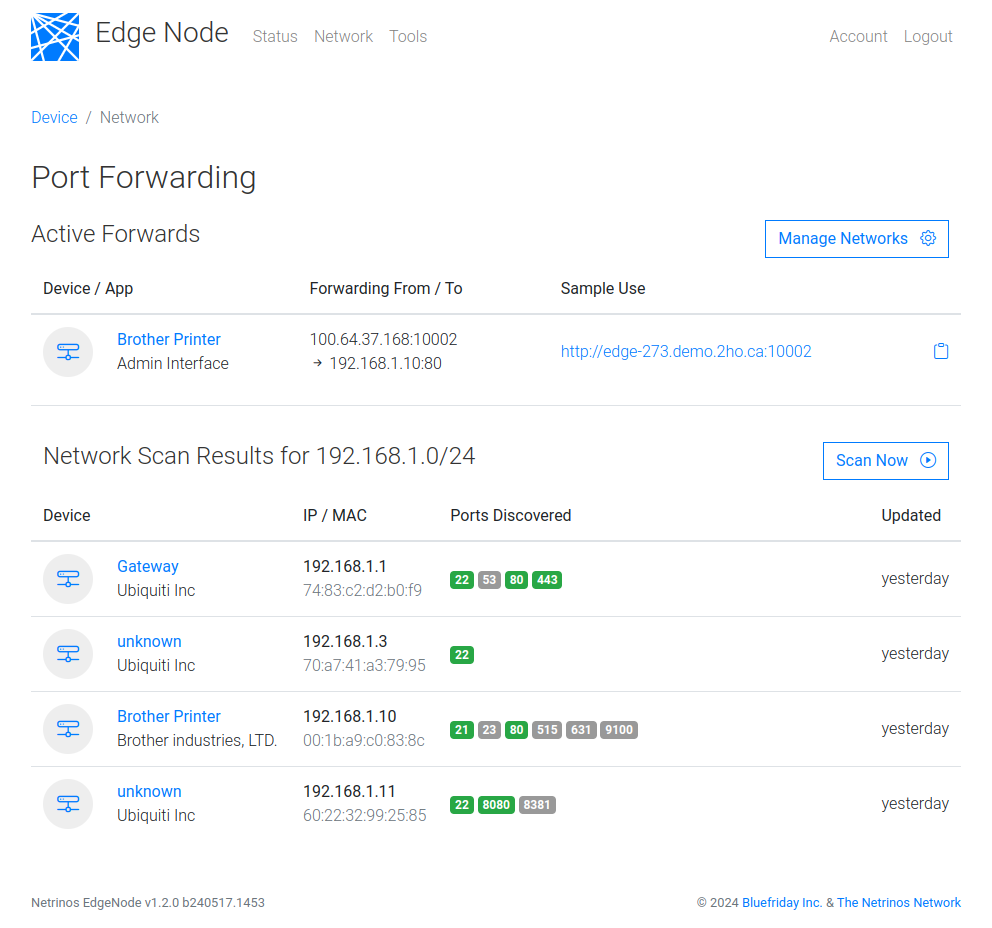
You should now be looking at the Port Forwarding page, which shows the list of devices discovered on the network.
Active Forwards will show any device ports forwarded we may have created previously. They will also show on the main dashboard of the edge device.
Below that are the Network Scan Results and the networks found.
The Scan Results will show a Device column with the Device Name and Manufacturer. The Name will probably be based on the device's hostname and may be cached by the local router. The name may or may not be accurate. The Manufacturer comes from the company that registered the MAC address. It may be the device manufacturer or the manufacturer of the network chip. It should be more accurate.
Beside that are the local IP, MAC addresses, and the ports that were discovered.
Netrinos only performs a TCP scan. Most devices that use UDP will also have something running on TCP. This is usually sufficient for discovery.
In this example, we will forward the admin interface of a Brother Printer. Scan down the list and look for the word Brother. You can use the ^F (find) feature in the browser. Click the link on the name.
Adding a Port Forward
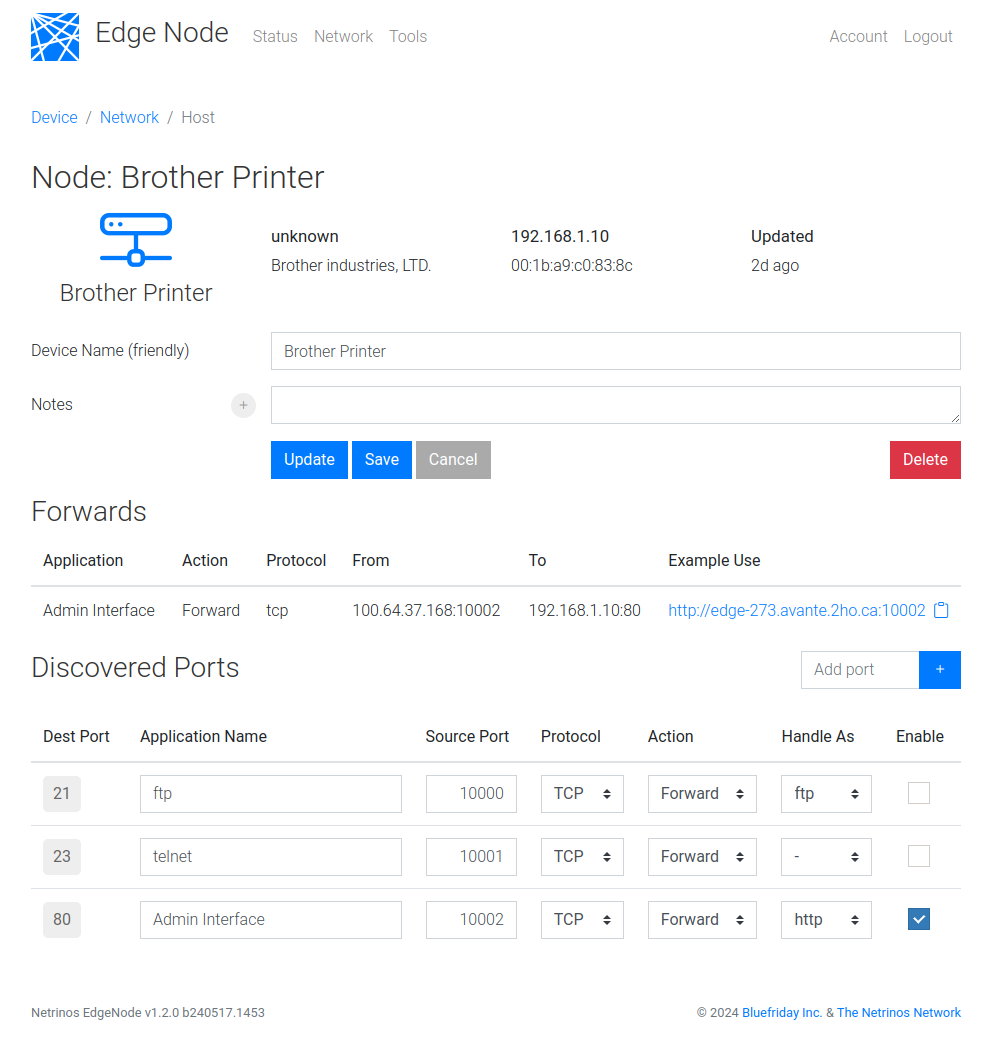
At the top of the Device page, you have a Device Name field where you can edit the name if it is incorrect.
Scroll down to Discovered Ports and find port 80. This is the web admin interface for the printer. For Application Name, type Admin Interface. Netrinos will suggest an available port. You can specify something else as long as it is free. The printer uses TCP and we want to Forward. And we want to handle the connection as http. Check Enable and click Update.
Under Forwards, you will now see the forwarded port. Under Example Use, you will be given an example URL you can use to access the device. This convenience feature uses the Handle As setting to guess a probable URL for the device. In the case of http it will probably be correct. Clicking it will bring up the printer's admin interface.
In the case of more complex protocols like RTSP for IP cameras, the device may listen on non-standard ports. And the URL used by the device will vary from device to device. In this case, the suggestion will probably be wrong. But there is a Notes field up by the name where you can save any documentation needed for that device. e.g. the access credentials or specific camera URLs.
If you know of a port on the device that was not discovered, it could be a higher port or UDP, there is a field on the right where you can add the port as if it were discovered. Netrinos only scans the first 10,000 ports by default.
Make sure you click Save.
Finished
Clicking Status at the top, or the Netrinos logo, will take you back to the dashboard, where you will now see the forwarded devices.